


Will Bender is a bicycle frame builder based in Fort Collins, CO. His custom frames run the gamut from all-road to gravel, touring, and modern hardtails. Last summer, Josh paid Will a visit to document his shop and learn about his background and approach to building bikes. While he was there, he enlisted Will to build the touring MTB of his dreams — a comfortable 29+ rig capable of carrying heavy loads and designed to harmonize with the Oddity Squid Fork made concurrently by another Fort Collins frame builder, Sean Burns. Continue reading below for the full rundown on this build…

Go to Fort Collins, Buy a Bike
I’ll apologize straight away for the cheesy title appellation ascribed to this piece. Living in Fort Collins for nearly half my adult life (and Denver for much of my childhood), I loosely considered myself a Colorado native – a coveted designation plastered on bumper stickers and t-shirts across the state. As such, I used to think that only a non-endemic interloper would use such an elementary abbreviation as FoCo to describe my beloved city.
Fort Collins itself is a silly name, as the city’s namesake fort only existed for a couple years before being washed away by the Poudre River in the early 1860s. The abbreviation FoCo, to me at least, is even sillier. But, alas, here we are; I don’t live there anymore and am quite fond of the syllabic rhythm in the headline above. Now, let’s check out this beautiful bike!

For as long as I’ve been riding bikes, I’ve been strapping bags and gear to them, heading out into deserts, forests, and mountains for solace and exploration (both physical and mental). Now, I’m no Ryan Wilson spending months on end cyclo-touring across thousands of miles in remote locations. Rather, I try to balance work and family commitments with somewhat regular local overnighters and rarer week+ long tours. And, 95% of the time I’m riding a mix of singletrack, 4×4 trails, and rough forest roads. In other words, I’m always riding a mountain bike.
Regardless of their intended purpose, I’ve always made the bikes I have (typically a balanced production hardtail) work for these loaded forays. Last year, however, I connected with Will Bender to design a bike that is specifically optimized to comfortably carry heavy loads across long distances and, most importantly, built to fit me perfectly.


I didn’t travel to Fort Collins intending to add another bike to my collection even though I’d been dreaming about a touring MTB for years. My original plan was to document Oddity Cycles while Sean built the Squid Fork I had ordered about a year prior, cover the FoCo Fondo gravel event, and meet up with Will to check out his new shop space and a few of his recent builds. My wife, on the other hand, had been searching for a new singlespeed and instantly fell in love with the gold hardtail Will had just finished for a customer (you can see that bike in the gallery here). Then, after hearing Will mention that he’d soon have room in his queue to take on a few more frame commissions, she gave him a deposit on the spot. After mulling it over for a few days, I did the same.

My First Custom Bike
Will and I went into this project with just a few important established parameters: I wanted a simple bike that would likely spend its life married to a rigid fork and would primarily be used for carrying weight on tours; Will wanted to build a light yet strong and compliant frame that, when not loaded down, could serve double duty as a 120mm hardtail, basket-equipped townie, or singletrack shredder.


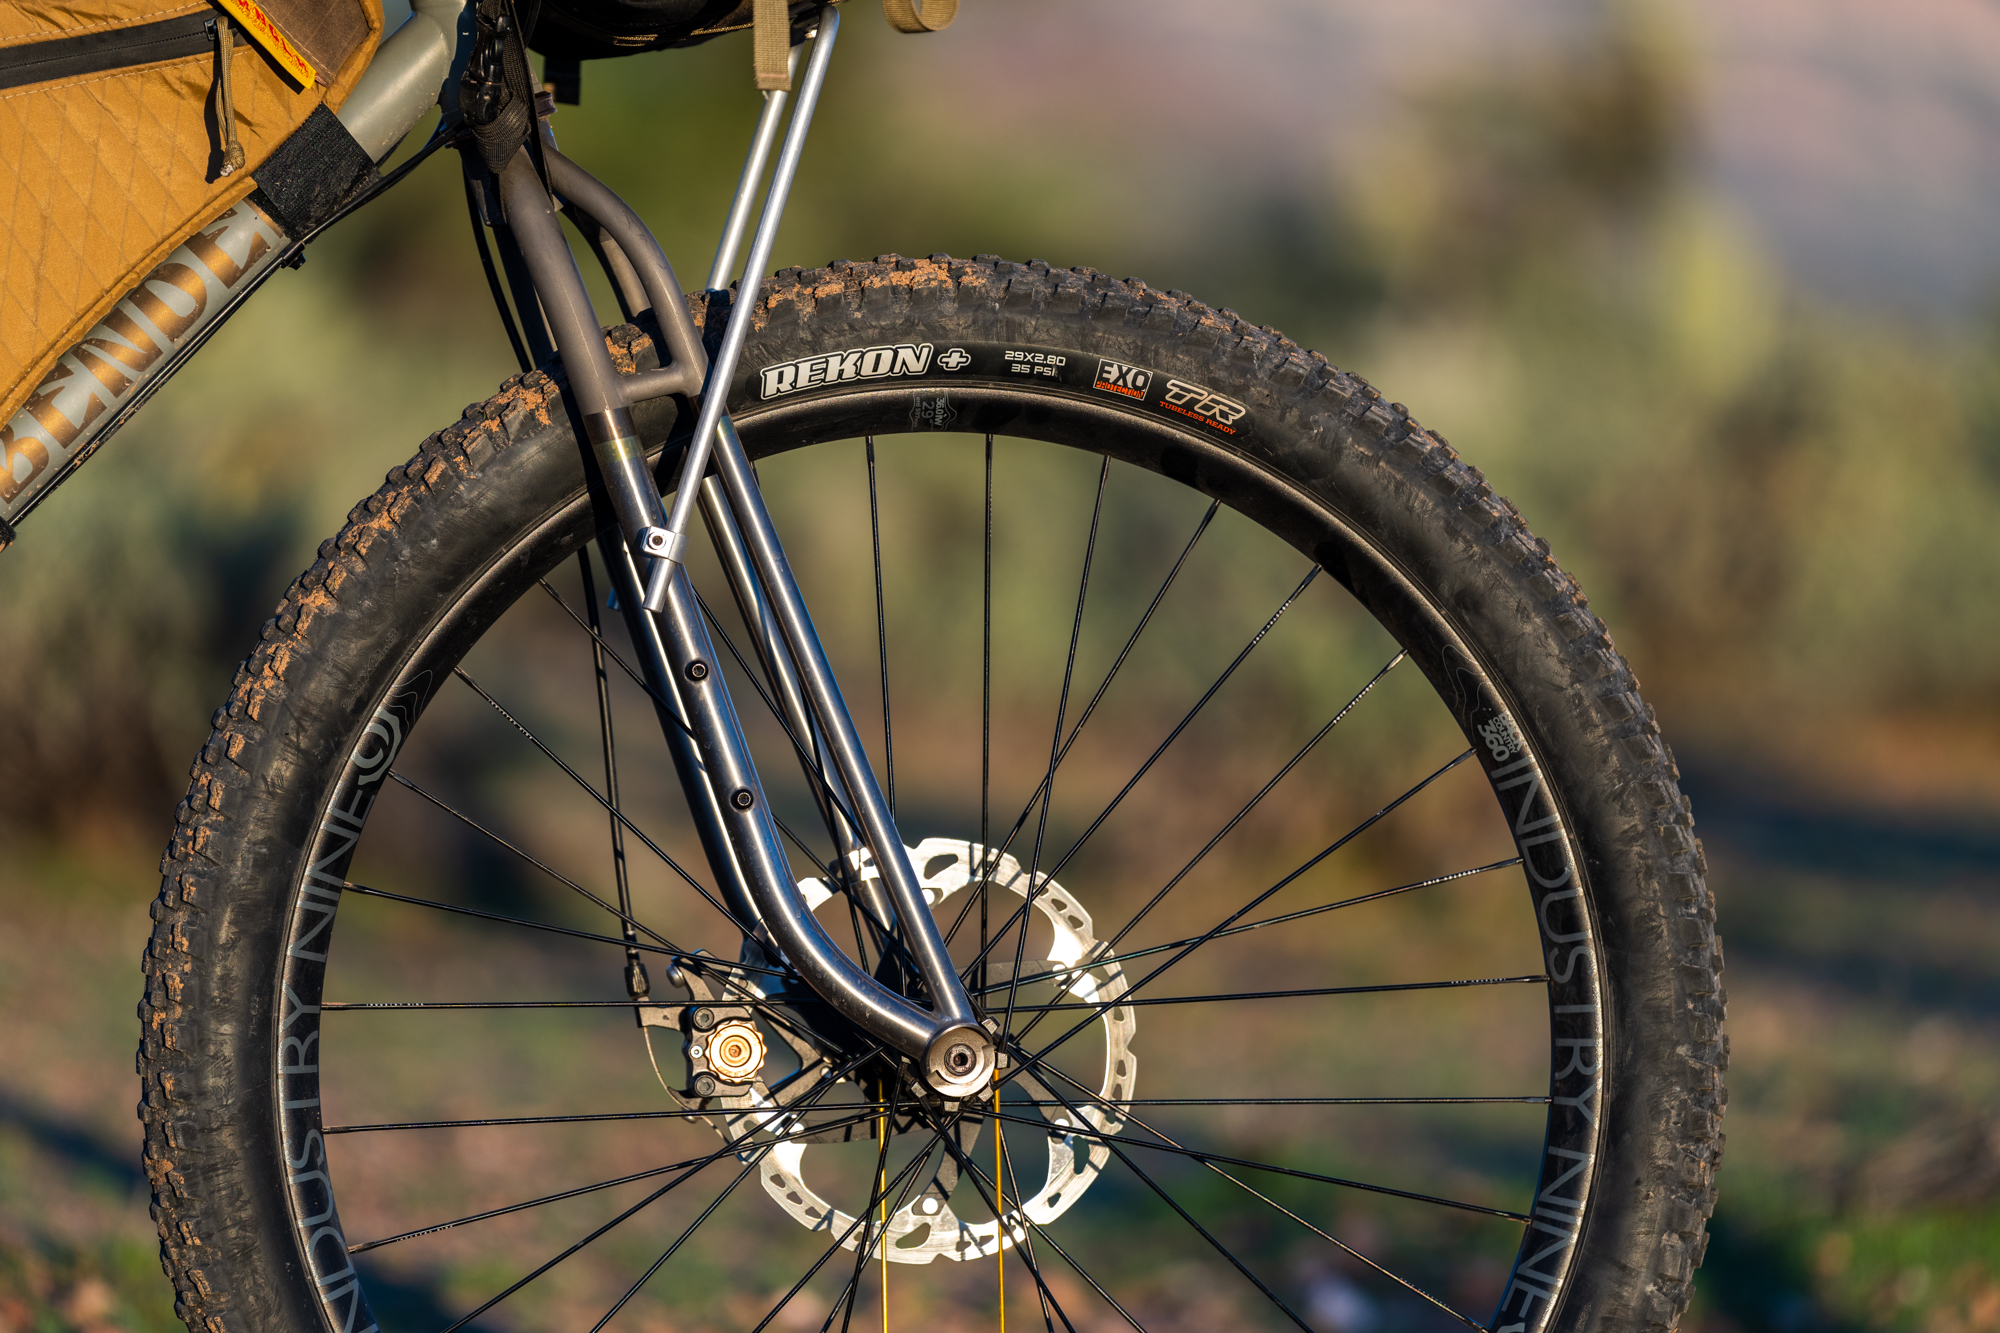
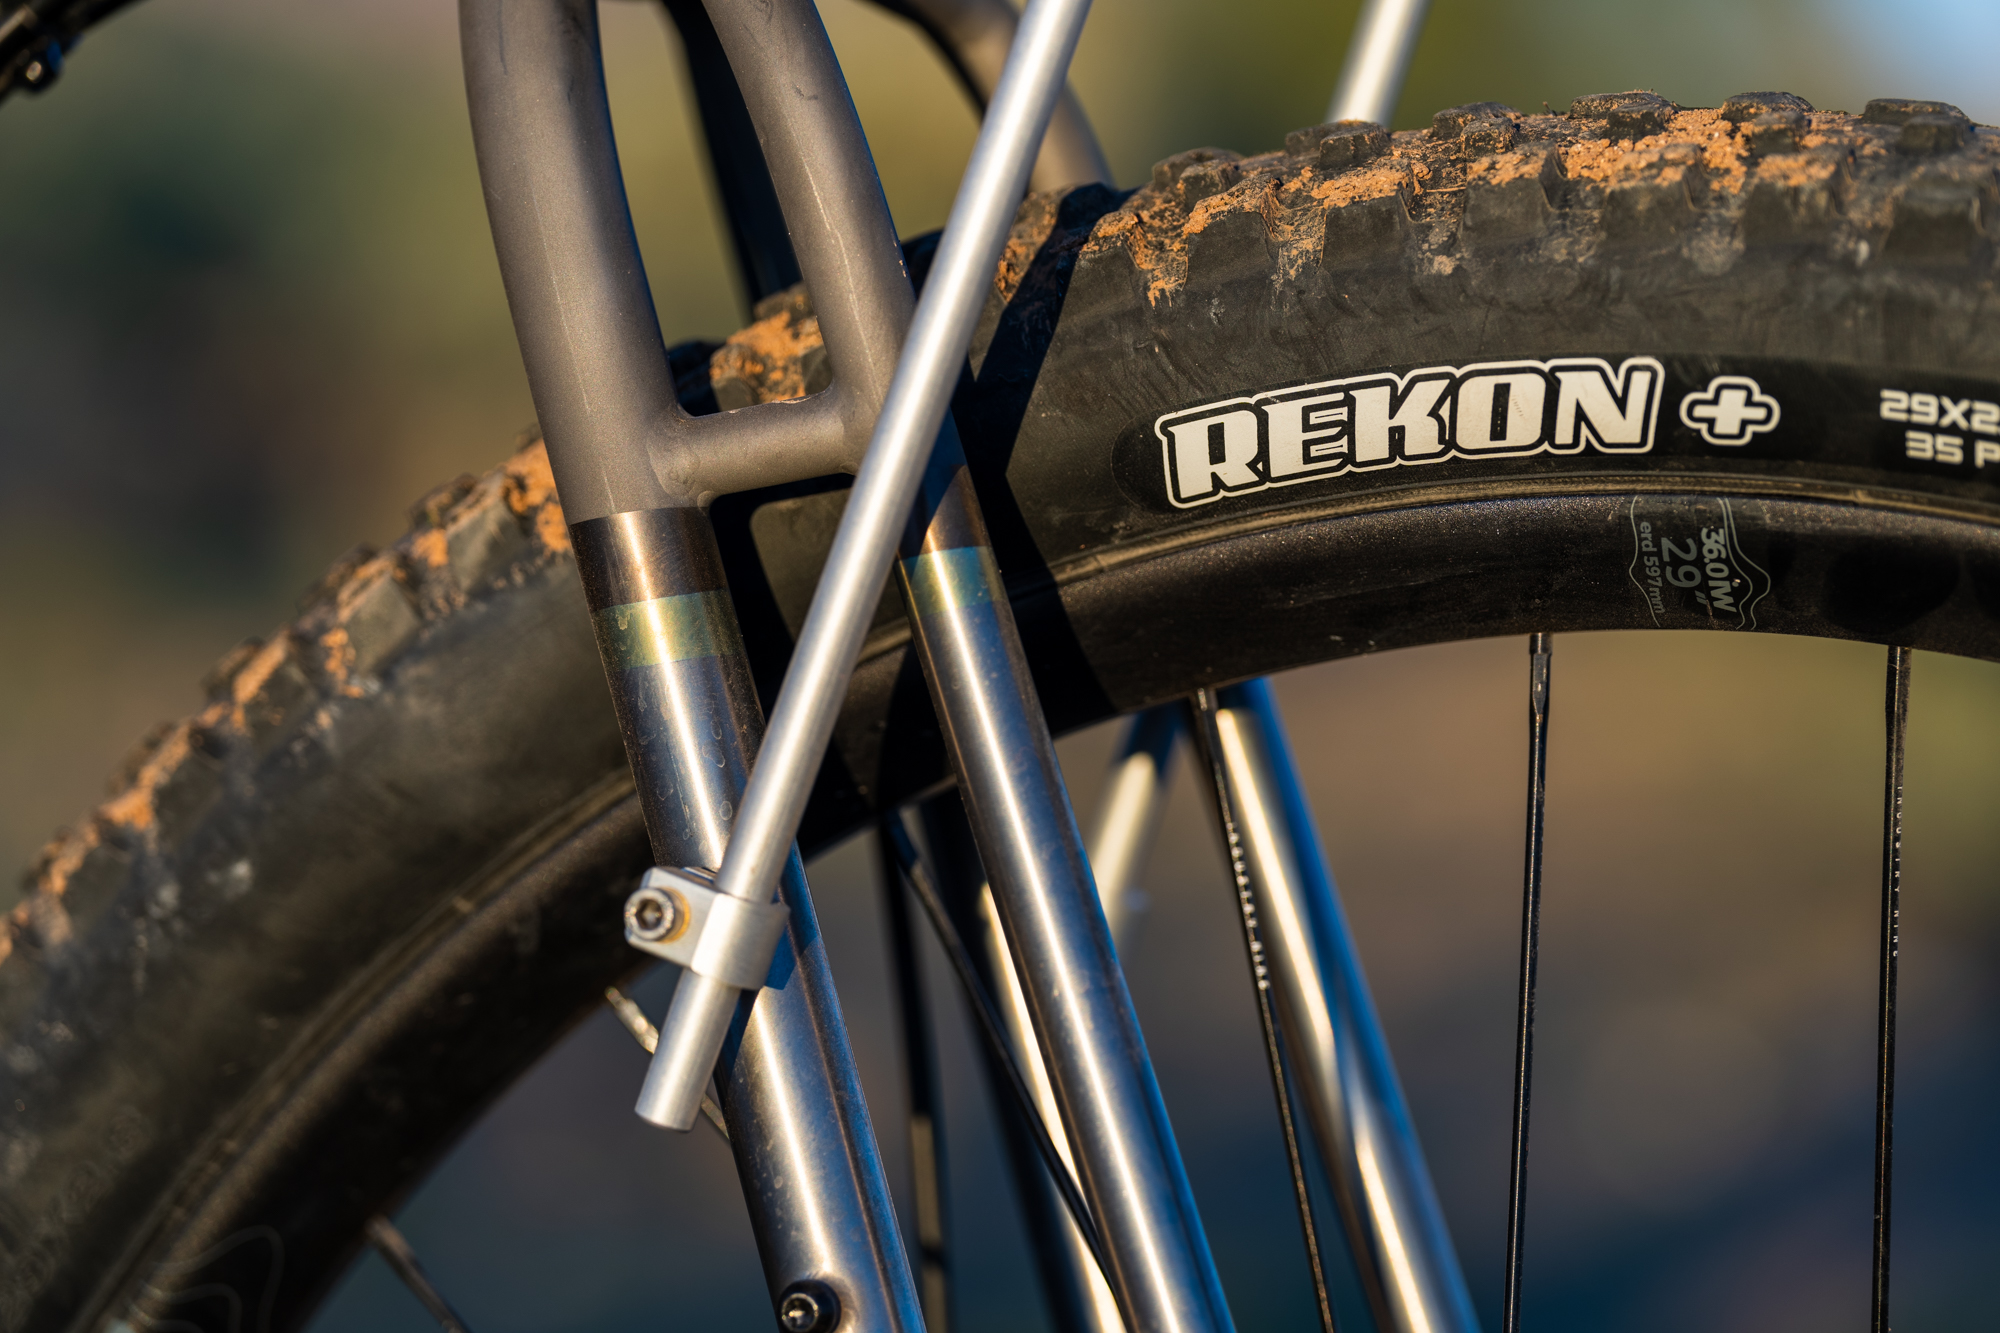
While the titanium Squid Fork would offer some compliance on bumpy and rough terrain (more on that below), so would 29+ tires. In addition to some geometric distinctions from Will’s previous touring frames, mine also differs in the incorporation of the proprietary Bender 3D-printed chainstay yoke rather than using the slightly wider (and slightly heavier) Paragon Machine Works yokes that Will had employed for other plus tire frames.
The Bender yoke is an elegant design that will clear up to a 34T chainring while still accommodating a wide rear tire. The only downside is that my bike’s rear end will only comfortably clear up to a 29 x 2.8 tire, but I’m okay with that as there are a couple of great tire options available in that size. Please, tire makers, keep plus sizes around!


This is the first custom bike I’ve purchased. I have (and have had) a lot of nice bikes, many of them handmade, but they’ve all been stock-sized or custom fit to someone else. There’s certainly nothing wrong with standardization, especially as more companies incorporate half-step sizing into their standard offerings. Still, making a bike work for touring can often lead to the similarly frustrating feeling of making a standard frame size work for my slightly uncommon body type. If you’ve been reading John’s bike reviews over the years, you’re likely already familiar with my bio-geo predicament: while a bit shorter than John at an even 6′, I have a long 34″ inseam and, respectively, short torso. To get a pretty good fit in a stock bike frame, I’m either hunched over on a size large with a super-tall seatpost and/or with inches of headset spacers or too stretched out on an XL. So, at long last, this bespoke Bender presented an opportunity to dial in a comfortable riding position while using my gangelage as an asset to open up the front triangle for frame bag fitment.


I already have a couple of “modern” hardtails with slack headtube angles, short chainstays, and long wheelbases, so Will was able to freely design a simple, functional, and purposeful build that isn’t trying to be a trail bike and a touring bike. The resulting fit is a bit more upright with shorter reach and more compact wheelbase than the other MTBs in my quiver. The chainstays are long enough to efficiently climb steep terrain and absorb trail chatter, but not too short where they’d lack stability especially while descending and/or carrying weight. And the reigned-in front center, paired with 50mm stem, gives it the kind of nimble and active ride quality that can be diminished with the longer/slacker bikes I’m used to riding. Additionally, this type of front end handles better with loaded handlebars than a longer and slacker alternative, which could experience a degree of wheel flop under load.

Designing a Bender
Of all the types of bikes I’ve ridden, 29+ is my all-time favorite tire size. For about six years I owned a Niner ROS 9+ equipped with 29 x 3.0 tires. It was one of the most fun and playful bikes I’ve ridden, in part because of its geometry, but also thanks to the meaty rubber I was running. The rear Maxxis Chronicle and front DHF+ had no problem literally rolling over shit. Rigid bikes sporting high volume 29+ tires (and lower PSI potential) can absorb much of the trail chatter and weather some bigger hits in place of a suspension fork. Plus-sized tires also offer added traction to overcome trail obstacles and, at lower pressures, float through sandy washes, glide over washboard roads, and are just plain fun to ride. Such characteristics were my favorite part of the ROS 9+ so it was a no-brainer that this rigid Bender would need to fit something bigger than a 29×2.6 tire that maxes out many other mountain bikes.


Fine-tuning tubing selection and profiles is another advantage custom steel bikes have over stock, or off-the-shelf, alternatives. Just as Will was able to fit the bike to my proportions, he also selected specific tubing that would save weight where possible and provide a comfortable ride quality suited for me and my use case. This bike is comprised of a mix of Columbus and Tange with diameters ranging from 31.6 to 38.1; the biggest is the downtube for strength, but it’s a lightweight butted tube. While stability is more important than anything on a touring bike, at 28lbs fully built it’s surprisingly lighter than it looks. So, unlike my aforementioned Niner or other stock frames made overseas that have to pass muster for international strength testing, the tubing of a custom bike can be perfectly tailored to not only enhance ride quality but also cut weight where possible.
“People always think of steel bikes as super heavy and, for big production companies, that is mostly correct. They have to build a bike that will work for all riders and are not able to consider their weight or riding style. A custom bike can be fully catered to a specific body and riding style allowing the bike to be much lighter.” – Will Bender


Possibly the most nerve-wracking aspect of a custom build project is finishing and color design. Will is becoming renowned for his bold, yet harmonious, color schemes rendering each new complete bike more striking than the last. You can see a couple of my personal favorites here and here. I’ve experienced great results with the Cerakote on my Sklar and I wanted my touring bike to have the same tested durable finish. While the color selections are more limited than wet paint, I wasn’t super picky, and Will was able to create a fitting palette influenced by the Southwestern US where the bike will mostly be ridden. He also drew inspiration from some of the parts I had already collected for the build, many in various shades of brown anodization. Flux Customs in Denver executed the project perfectly and after six months of strapping bags to it, I’m very pleased with how well it’s holding up. On our Aquarius Huts trip last fall, someone referred to it as a “box of chocolates,” which I think is quite fitting.

Does this Fork Look Odd?
Sean Burns and Oddity Cycles approach fabricating bicycle frames and components with a strong aesthetic emphasis and dedication to craftsmanship. As I mentioned in last year’s shop visit with Sean:
The practice of developing unreplicable processes through experience and visual thinking combined with using few, if any, pre-made frame parts with only the assistance of simple machines is… at the core of Oddity Cycles.
His creations stand out from what many others are doing in the bicycle industry, even in the handmade space, and have long appealed to me. That’s why I made a deposit on a Squid Fork nearly one year prior to receiving it; even though I didn’t have a bike for it yet, I knew it’d have a home by the time it was ready.


Until my visit to Fort Collins and meeting Will, I thought I’d have the Squid Fork made for my Amigo Bug Out. In a slimmer profile than the MTB version I ended up getting, it would have been a great compliment to a shreddy gravel bike. But I had just gotten the MRP Baxter suspension fork for the Bug Out and didn’t need a second fork. So, given their literal proximity and after learning Will and Sean were good friends (with Sean acting as an ongoing mentor of sorts as Will has built up his skillset and tooling inventory over the years), it only made sense to encourage them to team up.
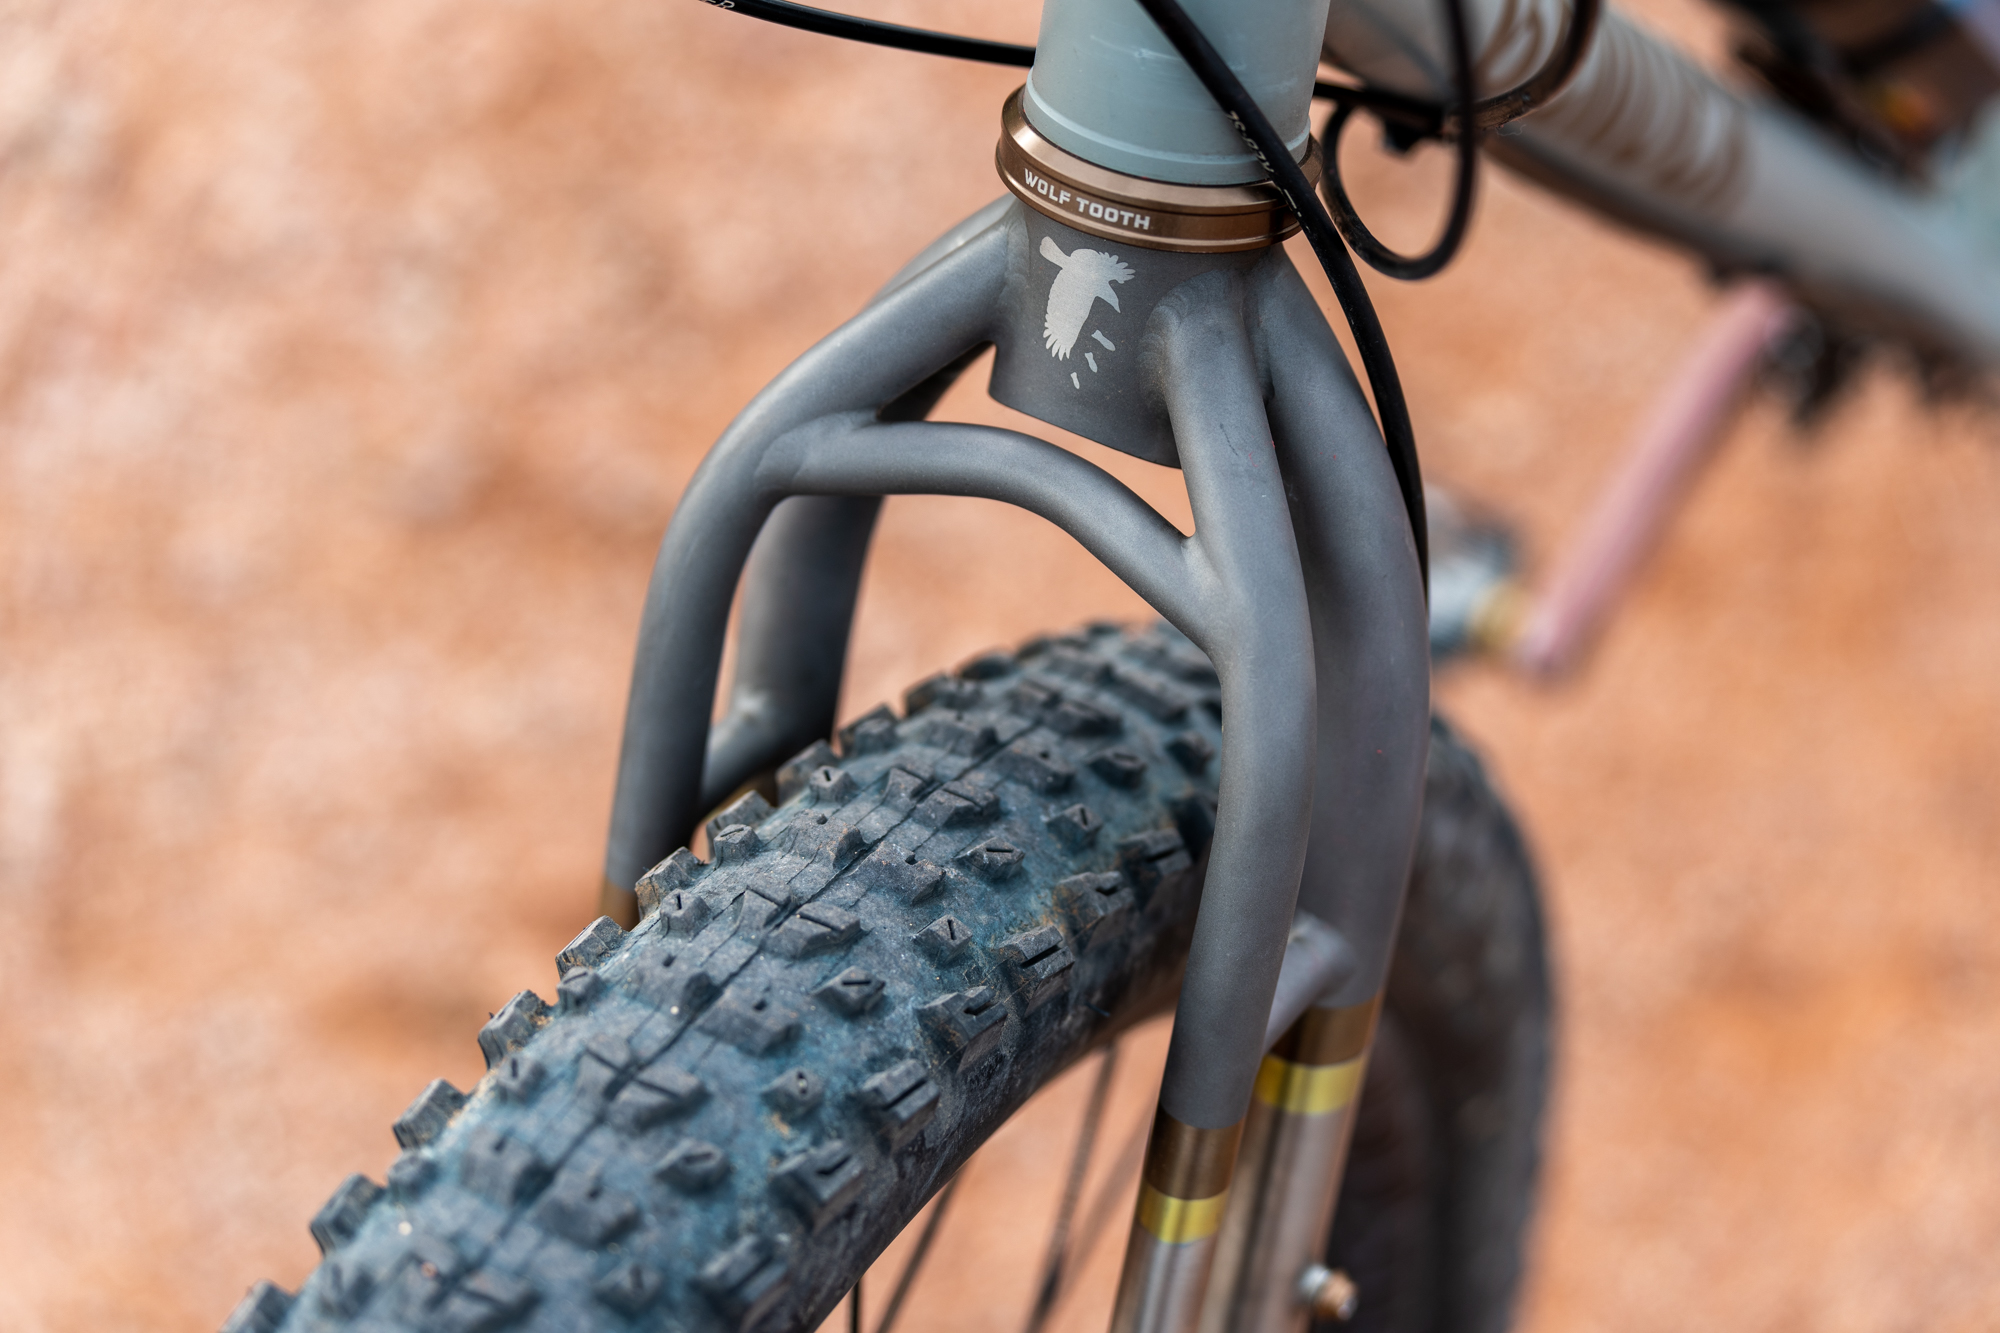
The Squid Fork is a single crown truss fork, which essentially blends the compliance of a more traditional dual-crown truss fork (which Sean also builds and can be seen here for reference) that’s simple and svelte like a unicrown fork. But, because there is more surface area than a typical dual-blade unicrown fork, the Squid Fork offers increased damping of surface vibrations before they reach a rider’s hands. Since my fork was built specifically for my Bender with the intent of using it for heavy touring rather than trail riding, Sean used a smaller and thinner tube than he would for a bigger more aggressive bike. For comparison’s sake, check out the Squid Fork Oddity makes for Why’s Wayward V2 hardtail; it uses thicker tubing than mine with blades spaced a bit further apart. For a gravel bike, on the other hand, Sean would likely make the fork even lighter.


According to Sean, though, the main benefit of this style fork (other than obviously looking really damn good) is that the extra blades help reduce brake dive, or backward flex, that some unicrown titanium forks can suffer from. Now, I haven’t had the privilege of riding other titanium forks to compare, but I can definitely attest to not experiencing brake chatter on my fork; and I’ve probably pushed its limits on steep, chunky, sustained terrain with a bunch of weight strapped to it. And, to be clear, my main goal in opting for a rigid fork over suspension was to save weight and gain simplicity. In a touring bike, where I’ll likely be out in remote areas not able to service suspension if something happens, it’s nice knowing I have one less variable to worry about. Plus, lightening up the front end makes a huge difference in how the bike rides.

While retaining unique and identifiable design characteristics attributable to each of the two makers, there is an intentional aesthetic harmony between the Bender frame and Oddity fork. The braces in the fork mimic some frame angles, such as the headtube and downtube, and their profiles are similar to the Bender yoke and NDS brake brace. Media blasting, anodization, and Cerakote are markedly distinct finishing methods but, on this bike, they look great together. Part of the decision to go with different finishes for the frame and fork was motivated by cost – it was cost-prohibitive for a three-color Cerakote application on the fork, even though it’s a much smaller surface area than the frame – but I’m also a huge fan of Sean’s media blasting/polishing work and he’s also been experimenting with in-house anodization. So, we thought it’d be fun to see how close he could get to brown and gold, aligning each with striping on the frame. I think we were all a bit pleasantly surprised with how close the gray Cerakote color we picked matched the media-blasted titanium.


Component Spec
Frame: Bender Bicycle Company Steel Frame 29+ MTB
Fork: Oddity Cycles Titanium Squid Fork
Handlebar: Oddity Cycles Titanium Lowrizer
Stem: Thomson BMX 50×22.2mm
Crank: Engine Cycles Port Royal 175mm
Chainring: aarn 28T Direct Mount
Derailleur: Shimano XT
Shifter: Shimano XT 12-speed
Cassette: Shimano XT 12-Speed
Brake Caliper: Paul Component Klamper Post Mount
Brake Lever: Paul Component Short Pull Canti
Rotor: Shimano XT 203mm
Headset: Wolf Tooth EC 34/44
BB: White Industries 30mm BSA
Wheelset: 29″ Industry Nine Back Country 360 with Hydra Hubs
Seatpost: Wolf Tooth Resolve 200mm
Seat Collar: Engine Cycles Dual Bolt
Dropper Lever: Wolf Tooth Light Action
Tires: Maxxis Rekon 29×2.8
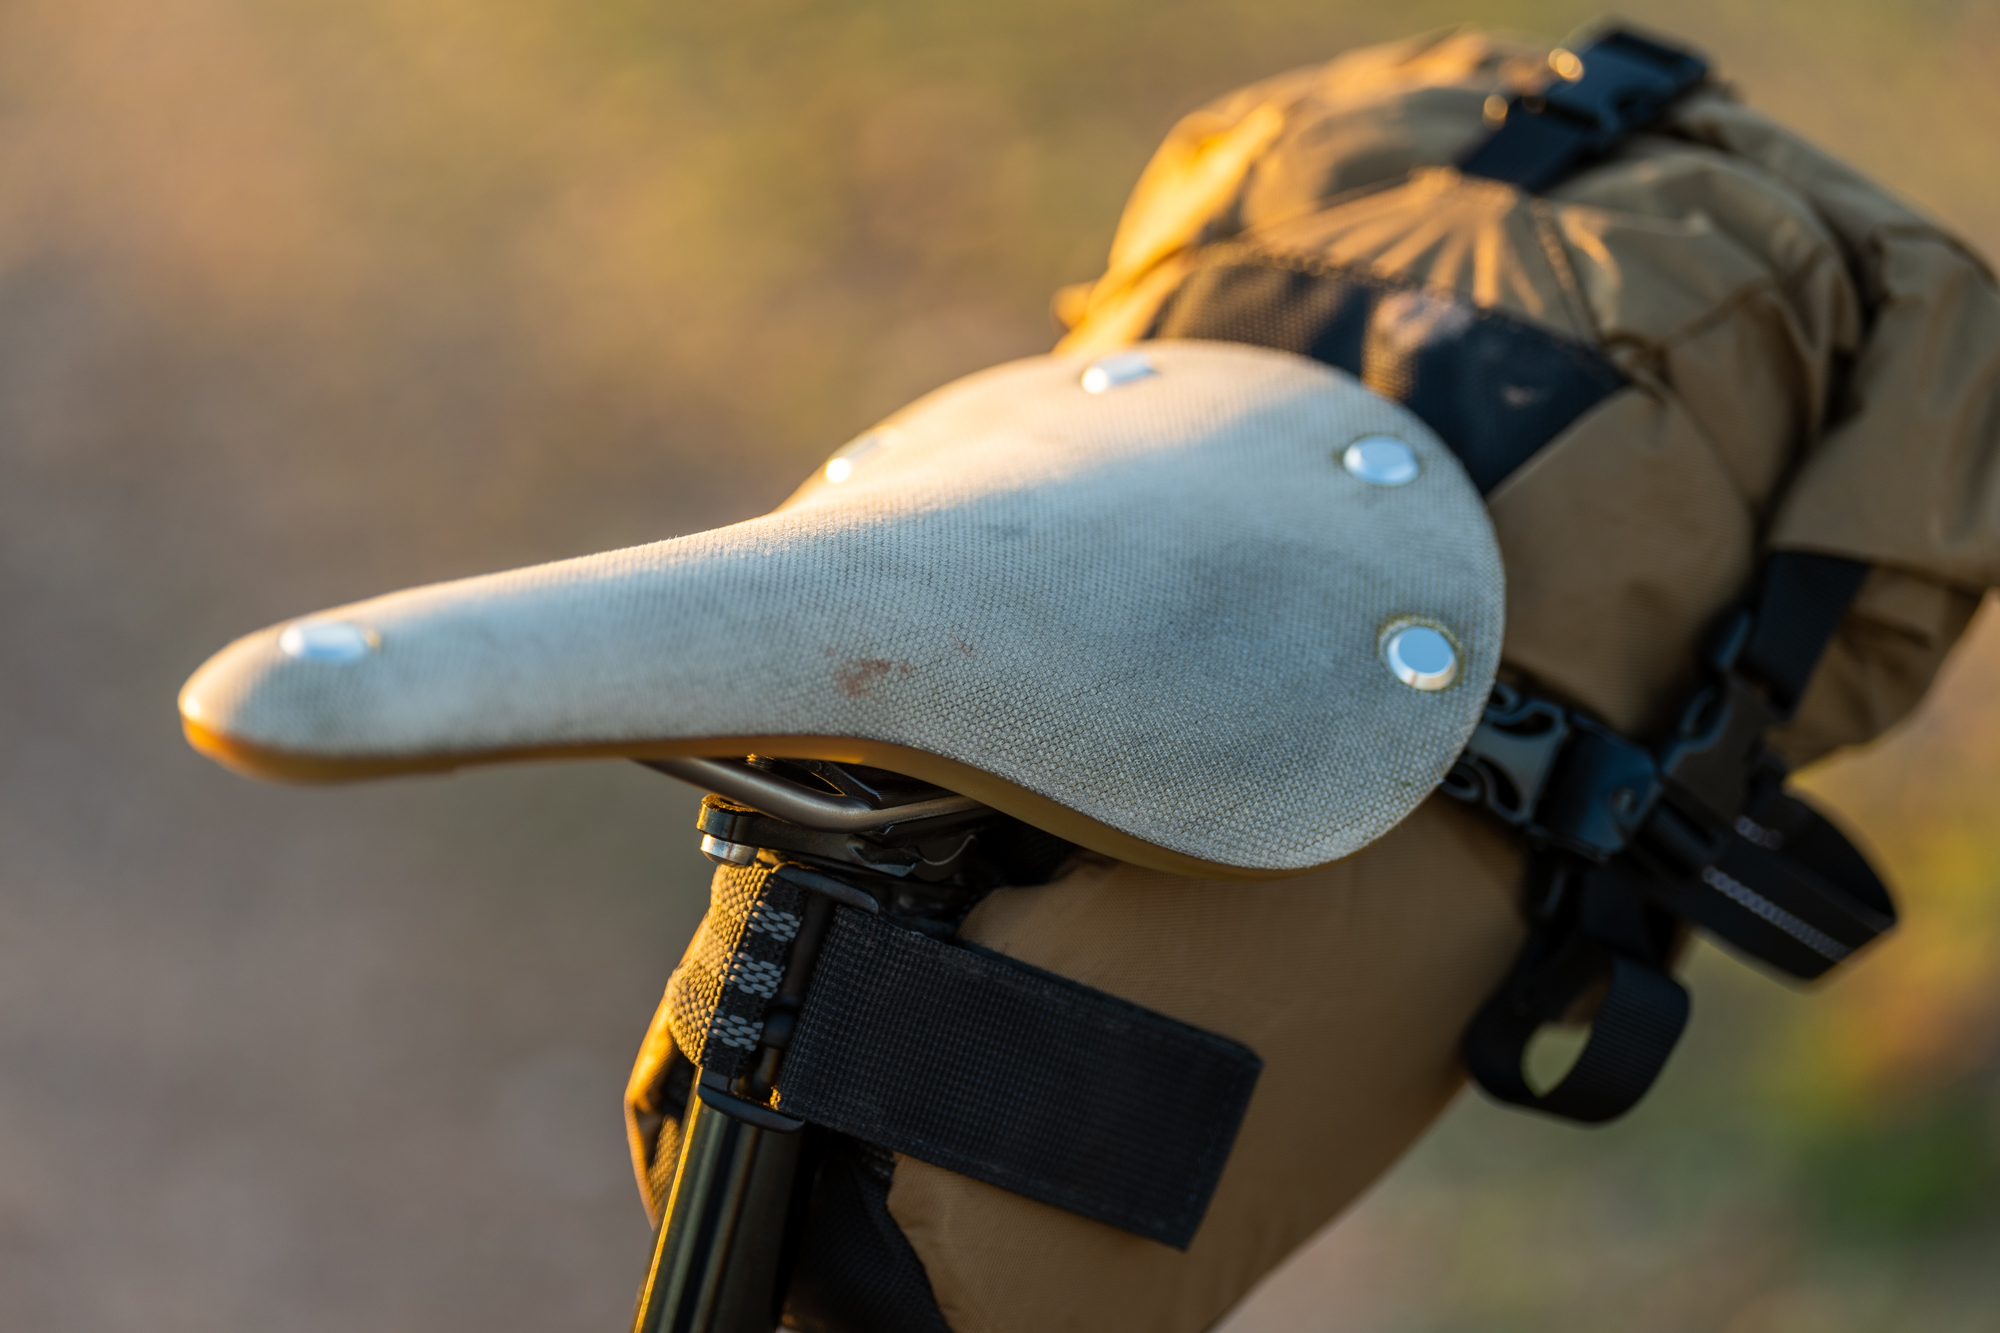
Saddle: Brooks C17
Grips: Ergon GP1 BioKork
Pedals: Shimano Saint SPD

Luggage
The bags pictured here represent my ideal setup for short trips, depending on weather and water availability. If I need to pack extra layers or more water, I’ll use a rear rack with panniers or Tailfin Aeropack. I like to store a water bladder and other heavy items, such as a tool kit, low in my frame bag to retain a sense of stability when riding. Then, on my saddle and handlebars, I’ll stash lighter stuff like clothing and sleeping gear. When I need more capacity for water, additional bottles go on my downtube or fork, and I’ll even move gear out of the frame bag and into rear panniers to have more water capacity in the frame bag. I don’t like touring with anything on my back other than a camera, so try to keep everything else on the bike.


The frame bag made for me by Tom of Vernacular Sewn Storage takes full advantage of the frame’s large triangle and stays put with the combination of laces and straps. I didn’t expect Tom to sew a flat bottom in the bag above the bottom bracket cluster, but I’m glad he did. This creates a nice base for organizing gear inside the bag, while also providing quick access to an externally-strapped small Wolf Tooth Teklite bag filled with tools and repair kit. It’s overbuilt using X-Pac with a beefy watertight zipper, strong seams, and an HD mesh internal divider like he uses for Go Fast Camper Space Frame Packs. I hope Tom continues to make bike bags because this one is legit!


For trips where the terrain is mostly technical singletrack, I typically use a handlebar harness and compression bag because they tend to move around less than other types of handlebar bags. But, lately, I’ve been trying to use my small Fabio’s Chest Ron’s Bikes because I prefer accessing the entire bag’s contents via its roll-top enclosure. The challenge, though, has been figuring out how to stabilize it when loaded. I was using Ron’s Pec Dec for a while, which works really well for what it is, but on fast and bumpy technical terrain, I notice the bag bouncing around.
Enter the Rod Steward from Shovel Research! Just released a few weeks ago, this support is made specifically for Fab’s Chests but might also fit similar roll-top style bags. It attaches to fork blades just like the Pec Deck, but with just two pieces of machined aluminum bolted together, it doesn’t have any pivot or hinge points that would cause it to loosen up over time. My fork slightly exceeded the 5″ recommended max width for the one available size of support, but I was able barely to make it work.

Maybe I’m in the minority these days, but I don’t mind using a lightly loaded seat pack on a dropper post (paired with a Valais Clamp, of course) when I can get away with it. However, there are few bags available that I’ve found to be secure enough for this application. In the past, bags I used would quickly loosen up from being tossed around on a dropper and then sag or, worse case, become lodged between my rear wheel and seat stays on a jarring descent. With the Swift Industries Olliepack, I haven’t had this happen. After two years of R&D work, the Swift team crafted this small pack that doesn’t wobble when packed and cinched. Its fairly small 6L capacity reduces the potential for overpacking, but I still try to only keep light clothing in there like a puffy jacket and other layers.


Cockpit bags typically consist of two water bottle stem bags and a top tube bag. The drive-side bottle bag pictured here is the Chuckbucket from Oveja Negra emblazoned with Brave New Wheel’s logo (legendary FoCo bike shop), which is unfortunately obscured by the Fab’s Chest. It lashes to the fork crown for extra security, so I’ll often carry a heavier bottle in it like a Nalgene in it. On the non-drive side, I have a Gibby Stem Bag from Swift. And, the most recent addition to my cockpit setup is the long Go-Go Top Tube Bag from Wizard Works I picked up at their workshop a few months ago. I’ve not had much luck with these types of bags in the past, as they are typically too wide causing my knees to uncomfortably brush against them while standing to pedal or, worse, interfere with steering when paired with stem-mounted bottle bags. But the Go-Go is tall and skinny with HDPE inserts to prevent it from getting floppy and mostly stays out of the way.


So, How’s it Ride?
This bike has exceeded my expectations during the six months I’ve had it. After only a few shakedown rides I loaded it up for a tour across Utah’s Aquarius Plateau. With lengthy sections of fairly technical and sustained singletrack, along with long stretches of washboard gravel and chunky 4×4 roads, it was the perfect trip to experientially test this idea for a touring bike. Then, in the months since, I took it on an epic multi-day ride on the Navajo Nation with my bud Jon Yazzie and multiple overnights close to home in the valley surrounding Phoenix, AZ.
Admittedly, I’ve been a little unsure about riding certain terrain at the risk of being “underbiked,” but I find the intentionality of line choice and enhanced connectivity to the trail – which is inherent in riding this rigid bike – to be quite refreshing. While not totally necessary, it’s nice having a proper tool for the kind of longer rides that are becoming increasingly common for me these days.

There hasn’t been a ride yet where this bike has left me feeling overly beat up, as I was kind of expecting. The lightweight frame and upright geometry make handling predictable – even with weight – while the high-volume tires, steel frame, and titanium fork and handlebars smooth out surface chatter. After dropping into a steep alluvial wash or blasting through a field of softball-sized boulders, I’ll often be surprised by how effortlessly I planned through such features. Just the other day, when Spencer and I were riding in the Superstition Mountains, I dropped into a short but steep descent with an immediate punchy climb on the other side. Following behind and seeing me pop out ahead of him, Spencer jokingly yelled out: “Did you find the bottom of your suspension?!” And I did, but it felt pretty darn good.
Thanks so much, Will and Sean! This bike is going to take me to some amazing places and I’m honored you both collaborated to make it happen.
Questions, feedback, critiques? Stories of your own dreamy custom build? Drop ’em in the comments!