


Rigid bikes. The roots of riding off-road, yet now the arena of weirdos, quacks, and masochists. Mountain biking started out long before telescoping forks and complex linkage designs, but the bikes of those early days are now a far cry from the activity most consider “mountain biking”.
Of course, those weirdos, quacks, and masochists still have a place in this world, and it turns out I’m one of them. It wasn’t always this way. I used to ride and write about my experience with suspension mountain bikes as a full time job. I could go on all day about spring curves and axle paths, dampers and volume spacers, sag and suspension setup.
But, in the past five or so years, my focus has shifted. I’d rather spend a weekend riding to small places and sleeping out under the stars than shuttling the local loamers and crushing parking lot beers. And in that time I’ve come to value a mountain bike that requires less maintenance.
Having ridden a lot of high end suspension bikes, I know what it takes to keep them running tip top – and I just don’t have the facilities to do that at home, nor the money to pay someone else to do it. A rigid bike makes sense for my sometimes bi-weekly, sometimes monthly mountain bike hobby.

The Evolution of My Mountain Bike
The first proper rigid mountain bike as I drifted away from dampers was the first long form review I did for the site here in 2015: the Surly Ice Cream Truck. I was at the time having trouble reconciling the undamped spring of fat bike tires and did put a suspension fork on that bike for the majority of the time I had it. Still, that bike peeled back just a bit of my attitude about rigid bikes. It was the first bike that I built a 27.5+ wheelset for, and that had a lot of staying power for me.
After returning from our three-month trip with 2.1” tires on our Wolverines in 2016, one thing Stephanie and I concluded was that we wanted some traveling bikes that were capable of more than a dirt road or smooth singletrack. She already had her Wednesday and I built up my 2017 Unit which, other than the Wolverine, is the longest running bike in my collection. This spring I finally wrote the story about how I almost sold it.
The bike that almost displaced the Unit was John’s desert tan 44 Bikes Ute. I gave it a good shake. I rode it a bunch on my favourite local trails. The 70mm offset fork was super fun, particularly with the Pass and Stow rack and dynamo system. But in order for a bike to displace the Unit, the 44 also had to be a viable traveling and commuting bike. With an effective seat tube angle of 75º on the frame that was custom built for John, I just couldn’t handle it.
Another bike that came into the collection unexpectedly and turned out to be a surprise hit was the 2013 Pugsley that I threw the parts bin at last summer. While it had nearly zero chance of displacing the Unit for everyday use, having another mountain bike in the house allowed me to get out on the trails without risking wrecking the Unit’s fenders, and reminded me that I do really like having a dedicated trail bike at the ready.
And that brings us to the Stooge Cycles Scrambler, the subject of this review and a bike I’ve been riding for the past eight months.


Stooge Cycles and the Modern Klunker
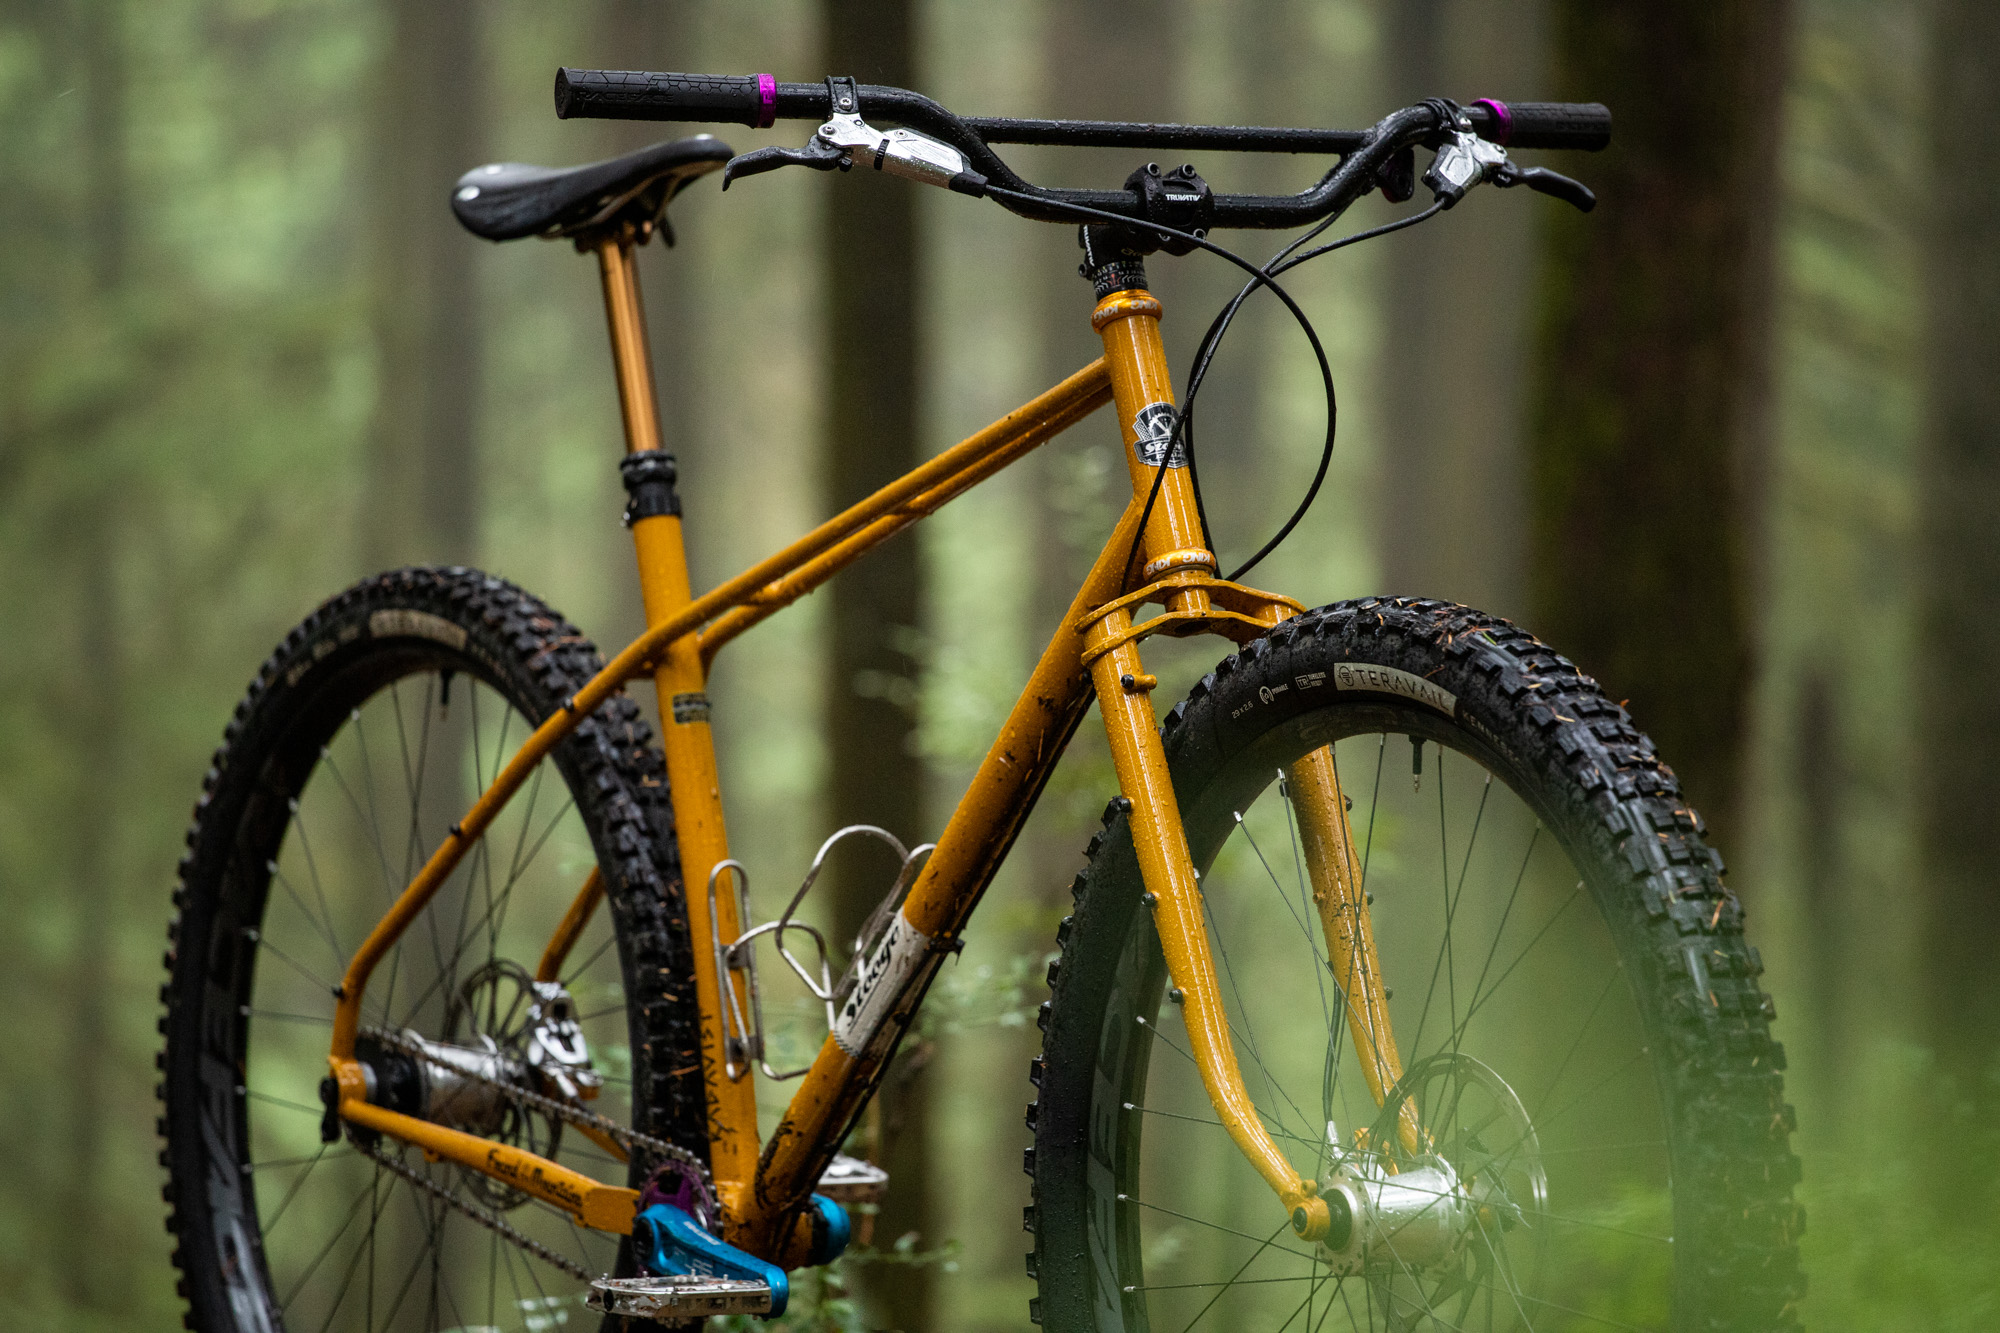
The aesthetic is the biggest conversation starter with the Scrambler. The proportions of Stooge bikes in profile – the curved, high offset forks with biplane crowns, twin or double top tubes, big tires, and wide, high rise bars – evoke not the rigid bikes of the ‘80s and ‘90s, but the klunkers of mountain biking’s roots in Marin County in the ‘70s. Add in a slack head tube angle, modern brakes and a dropper post, and you’ve got a recipe for a super klunker.
After the decision to keep the Unit and the failure of the 44 as a replacement, my rigid curiosity was still simmering away. I got talking with Andy Stevenson of Stooge about his bikes and his philosophy at first because I was just stoked on what he was up to. I wasn’t sure if I’d find a bike that could do all I wanted, but Andy’s bikes sure were intriguing.
Stooge is a one-person show, run out of Andy’s shed in Shropshire, England. His model for producing frames is simple: a limited production run of a single frame design, sometimes in two sizes, and for the next production run, it’s on to a new iteration. Each Stooge model builds off the last and, with subtle tweaks to the frames’ unique geometry, hones in on Andy’s goal of creating the perfect rigid bike.
The first Stooge model back in 2014 was dubbed the MK1. Slack, low, 27.5+ tires, and with a higher fork offset than you’d usually find on a rigid bike was the name of the game. The original Stooge is now in its fifth iteration with the MK5 landing in Andy’s shed any time in the next month or so. The most recent run out of the factory was the Dirtbomb, a 29+ capable, double top tube frame in a single size.
The Scrambler came before the Dirtbomb, and its inspiration was somewhere between the MK4 and another model called the Speedball, which was intended for 29” wheels and not nearly as progressive as the MK4. The Scrambler gets a 67º head tube angle, 57mm fork offset, and 65mm of bottom bracket drop. Still absolutely progressive by rigid bike standards, and a bit more suited to 29” wheels than the MK4.


About Wheel Size
Andy’s got a lot of stoke for 27.5+ wheels and the Scrambler will fit a 27.5×3” tire in the frame. But, I had two reasons for choosing 29” wheels for this build. The first was possible overlap with my Unit, which at this point is still living the good life. The second, however, and possibly more important, was the fact that 27.5+ tire choice is dwindling, particularly in grippy trail tires.
I was hesitant to commit to building a nice wheelset in a size that’s not well supported at the industry level. There’s lots of choice in 29” tires up to 2.6” wide and a few decent options in 2.8” as well. The Scrambler’s 65mm bb drop is suited to the big wheels and thus here we are. Because the frame was intended to be ridden with 27.5×3.0, the rear wheel clearance isn’t as big as I’d hoped – and I’ll get into that later in this review.

Single Speed Inspiration
The fact that I chose to go single speed with this build was somewhat unexpected. I suppose you can say my inspiration comes from the ultra racing community, and from some good friends who buck trends generally – but especially by riding single speeds here on the North Shore.
Let me just say that seeing Alexandera Houchin persevere through to win the 2019 Tour Divide on her single speed was incredibly inspiring to me. I’m honoured that Alexandera shares her voice with us here on the Radavist and absolutely love the humility and realness she brings to writing about her experiences with ultra racing.
Bailey Newbrey’s 2018 Tour Divide effort was also eye opening to me. I guess I’d just never really considered ultra distance events with a single speed, but now that I have one, it makes complete sense. I aspire to do big rides like this, but with two young kids, that’s a few years off. For now, I’ll live vicariously through my ultra idols.
Locally, I’ve got a couple of friends who are dedicated single speeders and while their passion verges on insanity I consider them kindred spirits in their desire to try weird stuff. Adam is an ultra racer with four finishes on the AZT and two at the CTR. Andrew is a consummate tinkerer and fellow writer who doesn’t shy away from unusual solutions to problems.
Andrew, Adam, and myself overlap in the local bike community all over the weird spectrum, and I am grateful for both of their input and guidance in putting this build together. Not surprisingly, both ride Walt Works customs.
The final piece that inspired me to go single speed with this build was John’s move to Santa Fe, and his single speed conversion of his Retrotec, which stands as one of my all time favourite hardtails I’ve ridden. Seeing John and Bailey do their thing in the high mountains got me super stoked to get a proper mountain bike going and a single speed at that.


From the Frame Up
My builds often begin with a single design constraint or aesthetic ideal. In this case, I wanted to avoid parts that were black with white screened logos. I also wanted to have a bit of colour, but to avoid going over the top with matching anodization. Just a splash here and there. Oh, to have it perfect in 2021 – yeah right.
If my desire for simplicity and low maintenance implied that I wouldn’t be taking advantage of some key performance mountain bike advancements for my first purpose-built trail bike in years, I apologize. Wide rims, big tubeless tires, a dropper post, and – not part of the initial build but had to happen once I found out how capable the Scrambler was – hydraulic brakes were all on the list.
As soon as I held it up to the frame, the gold King headset that I was intending to put on my Rock Lobster kickstarted the build. My next thought went to the silver Race Face hubs that I’d always wanted to do a build around. The rest came together as I lined up what parts I could that also fit my constraints.

The Stooge Junker Bar and Bike Fit
You know I’m a huge bike fit nerd and that doesn’t just go for drop bar bikes. One thing I’ve found with the rising popularity of bars with lots of rise and sweep is that there’s huge variation in how each bar fits. Not only does the upsweep and backsweep come into play as with an average mountain bike bar, but the angle of the riser portion also affects where your grips end up.
Andy sent along a Stooge Junker 70 bar with the frameset: it’s got 20º of backsweep, 70mm rise and, since it’s steel, a 22.2 clamp section. I’ve done my best to show this in the photos, but the riser portion of the Junker bar is almost vertical when you’ve got the grips at a mostly backsweep, slight upsweep position.
Most bars come back from the clamp at least a bit, which means the Junker bar puts your bars further forward and thus needs to be run with a shorter stem. This turns out to work well aesthetically as the 20” frame has a relatively short reach in the ~455mm range, but I’ve landed on a 60mm stem with that bar.
In contrast, I put a Soma Dream bar on the bike and had to use a 90mm stem to get the same reach to the bars. Surprising! Anyhow, because of the slack head tube angle and the higher fork offset, the Scrambler’s front-center measurement is actually longer than my XL Unit frame, so any concerns about the frame being too short to go fast on trails were unfounded. It’s still a really long bike.

Big, Heavy Tires
I wanted the biggest tires I could fit. Andy had test fit a number of 29×2.6 tires in his personal Scrambler, so I figured I’d be in the clear with two 2.6 Teravails. Unfortunately, this iteration of the Scrambler is just a bit too tight for the true 2.6” width of Teravail’s 2.6 casing. So, I’ve ended up with a 2.6 on the front and a 2.4 in the back.
The combo is a 2.6 Kennebec in the Durable casing and a 2.4 Kessel in the Ultra-Durable casing. Both tires weighed spot on as claimed at 1125 and 1215 grams respectively. That may sound heavy but I’d rather run low pressure in heavier tires than have to air up lighter tires until they don’t provide any suspension or damping.
I’ve landed on about 16 psi in the front and 21 psi in the rear, and occasionally bottom out on the rim on chunkier high speed sections. The heavy casings provide great damping and while I would prefer to run the 2.6 in the rear for extra rim protection, I can’t complain about the 2.4 Kessel’s performance.


Wheels for the Future
Since I first saw the Race Face Vault J-Bend hubs, I knew I’d one day build a wheelset around them. These hubs use the same 6-pawl, 3º engagement internals as Race Face’s (and Easton’s) high end wheelsets, but with j-bend flanges and a choice of colours. I was tempted to go purple but figured silver would have more staying power. I still wonder if I should have done purple!
Looking to build a wheelset that could potentially move to other review bikes in the future, I opted not to go with the widest rims the tires could handle. I went with a middle ground of 35mm internal with the Race Face Arc 35 Offset. While weight wasn’t the first priority for the build, the 35mm rims save about 40 grams per rim over the 40mm option.
Finally, I went with black DT Revolution 2.0/1.5/2.0 spokes and silver DT aluminum nipples. I built the wheels with my 11 and 14 year old nephews giving them each a chance to assemble their first wheel from scratch. It’s super cool seeing a wheelset come together from pieces over an evening!


Brooks on a New Fox Transfer
I had a couple of bikes in the past with 20” seat tubes and the dropper posts were only able to accommodate 125mm of drop at my saddle height. The new Fox Transfer has an updated post head that lets me run a 150mm drop, which is rad! If I’m being completely vain and honest, I also chose it because it had a colour option that wasn’t just black.
A Brooks on a dropper has become a bit of a meme over the past few years, but given that I don’t sit down that much while pedaling the single speed, I may as well have a super comfy saddle for when I do sit on it. I tried a couple of plastic saddles but landed back on my old C17 and I think it really suits the klunker aesthetic.

Silver SRAM G2 Ultimate
It turns out this bike is way faster than I was expecting. The geometry and the wheel and tire combo makes for a ripping good time. So good that I was outriding the power of my beloved Paul Klampers within a few rides. Of course, most brakes are boring black with screened white logos, and that just wouldn’t do.
I found out SRAM was doing a polished G2 Ultimate brake this year, and knew they’d be just right. What a difference on the trail. I know my focus in bikes changed and for the most part cable brakes are adequate, but for a capable trail bike, hydraulics are key to avoid hand fatigue. I hadn’t ridden brakes with a pad contact adjustment in a while and find it’s nice to be able to completely dial in your lever position and feel.
After installing the G2s I found I had a bit of vibration out of the front brake during light braking. One possibility was the 200mm IS to Post adapter, which is what led me to source the gold adapters, locally machined up in Whistler by North Shore Billet. I also faced the IS tab to remove what paint was there and ensure a flat surface. No more vibration, and great stopping power and modulation.

Silver Chromag Scarabs
You saw a pair of these Chromag Scarab pedals on my Unit and I was hoping for a silver pair for my Scrambler. Problem was, Chromag didn’t have any and neither did our local distributor. Well, I saw this pair hanging on the wall in the background of my friend Jeremy’s Instagram story. I asked if they wanted to sell them, and after a couple weeks, they relented. My dream pedals!

Single Speed Setup
Adam and Andrew were probably both very happy when I got this bike built up. It meant I could stop incessantly bugging them about gear ratios and other inane build details that only they would care about. Both recommended a gear around 40”, a bit less when you’re first getting going and a bit more if you find you need more speed.
There are a few ways to accomplish this, depending on what rear cog you use. Referencing the great Sheldon Brown, we find that 28/20, 30/21, 30/22, or 32/23 all get you into the ballpark. I was completely ready to go for 30/21 and borrowed an Endless cog from Adam, but it turned out I couldn’t find a 30 tooth chainring for the blue Race Face Atlas crank I’d picked up. I could get a 28, and it also turned out that Adam had a 20 in his bin. What wonderful parts bins people have!
My quirky friends were spot on with the gear ratio recommendation. Despite the gear feeling extremely high for singletrack climbing, it’s pretty spinny for getting to and from the trails. Compromises, always.

Klunkin’ Ain’t Easy
Trails have changed a lot since the Repack days in Marin County. We live on Vancouver’s North Shore at the base of Mt. Fromme, another mecca of mountain bike history, where trail riding took a dramatic turn in a highly technical direction in the ‘90s – the legacy of which still snakes through primeval forests that are dank and dark more often than they’re anything else.
The steep, often awkward, low-speed-yet-high-consequence lines of rock armour and ladder bridges of the historic North Shore are perfectly suited to the modern klunker that is the Stooge Scrambler. Trails like Pipeline, Ladies Only, and 7th Secret offer puzzles to solve ride by ride, working toward linking up a clean run and sessioning features to unlock their secrets.
In the shadow of the decaying skeletons of mountain biking past, faster “new Shore” trails like Expresso and Bobsled provide a different ride experience, and appeal to a broader range of people than the legacy lines. On these faster trails, the Scrambler loves to let loose. It’s here that I find out when I don’t have enough pressure in the tires and haul into corners with just a bit too much speed. It’s a lot of fun.
We also have a number of technically challenging yet rewarding singletrack climbing trails. I’ve often said that if our local climber started at our house and ended at our house, with no descending, I’d still be happy with my experience of mountain biking. Riding the single speed presents a different challenge, as the 28/20 gear is about twice as hard as the easy gear on my Unit or even my Wolverine.

Another Single Speed Evangelist?
Once I got riding the bike, I found myself absolutely loving the single speed life. The aforementioned Andrew describes a single speed as having three gears: sit, stand, and push. There’s almost no time when your chosen gear is the “right” gear, but the simplicity of never thinking about shifting is there. I find moving through the forest on a single speed is actually a lot like trail running. The terrain determines how quickly you can pedal, and sometimes walking is the right thing to do! It’s pretty dang chill!
Back when we got started writing about our experiences with bikes we rode fixed gear and there was a lot of talk about the zen of the fixed riding experience. The same can be said for a single speed mountain bike: a silent drivetrain that’s never in the right gear, but since you don’t have a choice, it doesn’t matter!
Funnily enough, because most of my time pedaling this bike on trails is spent standing, I end up doing most climbing with the seat down and out of the way. Because of this, and knowing that for endurance efforts (like all-day rides or touring) I need a lot of saddle setback, I now know that I could have a much slacker seat tube angle on a dedicated single speed bike than I would want on a geared mountain bike.
The interesting thing about rigid bikes, compared to bikes with front or dual suspension, is the geometry stays the same all the time. On a hardtail, your angles get steeper as the fork compresses. On a full suspension, angles steepen under braking and slacken under climbing. Obviously these factors are taken into consideration in the design and tuning of suspension bikes, but there’s something pure and simple about a rigid bike.
I don’t mean to wax about the rigid bike experience – it’s not for everyone – but rigid bikes are much different than they have been in other eras. Not the steep head angles of early 29ers, or the short top tubes of the ‘80s and ‘90s, Stooge’s bikes are real modern trail riding bikes.


What’s Not Finished
You may have noticed that the stem is not only a 31.8 clamp, but also is black with white screened logos. The horror! Don’t fret, though. Fit parts tend to be the last thing I finalize on a build. And then, it turns out finding a longer-than-50mm, 22.2 clamp stem is actually kind of difficult! BMX stems are mostly all in the 48-53mm range and I would ideally have a ~65mm stem. Profile Racing makes a 63mm version of their Push stem. That’ll do! In time, of course.
Another part of this build that was cobbled together was the single speed setup. My friend Gari had one spacer from a DMR kit (black with white logos!) and a pile of bottom bracket spacers in his bin. It works, but it’s not the best. The Endless Bike Co Fibonacci spacer kit looks great, and at the same time I should order a new cog and give Adam his cog back! (Thanks Adam!)
Of course, these things are pretty inconsequential. A friend recently posted a photo of his vintage mtb build saying he had been waiting for it to be “finished” before posting it. But then he realized his build might never be finished. I’m personally extremely guilty of this (where is the story on my Rock Lobster that I’ve had for four years?!) and do need to accept that a snapshot in time is just as valuable as seeing something “finished”. White logos be damned.

What I’d Change
For my own rigid mountain bike dreams, I’m a bit torn with the Scrambler. I’ve absolutely embraced the fact that I’m a single speed weirdo. And for that, I’m not sure an eccentric bottom bracket is the ideal solution. The eccentric, which gives you some freedom over bottom bracket position when running gears, is actually a limitation when single speed. Your chain needs to be tensioned, and the bottom bracket position is determined by your chainring and cog combination as well as how worn your chain is.
Second, the tire clearance is less than I’d like. I’d really like to be able to put a 2.6 Teravail in the back of this bike, possibly even something like a WTB Vigilante 2.8. Alas, the Teravail Kessel 2.4 is a good tire, and I suspect the frame will clear a 2.6 Maxxis and possibly others. Of course, I might actually enjoy riding the bike with 27.5 wheels, or perhaps a 29/27.5 mullet setup.
Another factor that I didn’t anticipate with riding single speed is how I basically don’t climb singletrack with the saddle up. This means it would be absolutely reasonable to have a seat tube angle that would allow for my touring saddle setback (read: a lot) which would not be a detriment to the bike as a mountain bike. I’m thinking 72º effective, or even slacker, would work well for me.
There’s a good chance that the lineage of this build – both what came before it in the Unit and the 44, and what’s to come next – will lead me toward a custom frame that incorporates more of my personal philosophy and fit needs. A bike that can be both my touring bike and my mountain bike. And that might lead me to some ultra distance efforts in the future.

What I Wouldn’t Change
As a production bike, the Stooge Scrambler and Andy’s goal to create the best rigid bikes – and to make them relatively affordable – are still just as interesting to me as when I first reached out to him to chat. I love his approach to designing and selling bikes, even though there’s most certainly a more lucrative business model out there.
Andy tells me that with the popularity of this Scrambler model, there will be a follow-up model coming next spring, with a couple of tweaks including more tire clearance in the rear end. I don’t personally think it’s worth me swapping frames just for that, but if you found yourself intrigued by the Scrambler or by Stooge’s bikes period, there’s a heck of a lot of value and radness in this modern klunker.